"/>
"/> "/>
"/>Tips and tricks for easy printing with transparent PLA
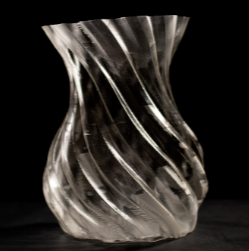
PLA is one of the easiest and most accessible materials in 3D printing. It has a wide variety of colors and can be purchased anywhere. Among them, there is one that stands out more than the rest; transparent PLA. In this article, we will teach you how to print with this material and how to get the most out of its main feature; transparency.
First of all, it is important to explain the difference between translucent and transparent. A transparent material is one that lets light pass through and allows you to see clearly through it. A translucent material, on the other hand, allows light to pass through but does not allow you to see clearly through it.
Achieving a completely transparent PLA is going to be very complicated, but we are going to give you some tips to make it as translucent as possible, even reaching transparency.
The main points to be taken into account are the following:
- The layer height
- The infill
- The layer bonding and glossiness of the layer
- Post-processing
Layer height
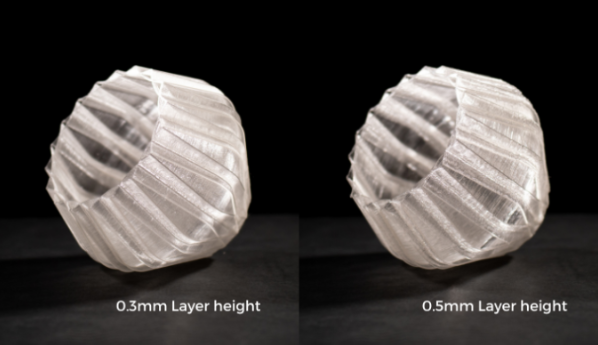
Although it may seem strange, one of the things that most influences the transparency of a material is the layer height. When light passes through the part, its dispersion is greater when passing through a layer change than through the layer itself, so the higher the layer height, the fewer layer changes there will be, and the easier it will be for the light to pass through the object in question.
It is recommended to use a layer height of more than 0.4 mm to ensure good transparency. For this, it is important to use hotends with a large nozzle diameter, preferably 0.8 or 1 mm.
It is true that the surface quality of the piece will decrease minimally but taking into account that to increase its level of transparency it will be necessary to do post-processing as, as we will explain in one of the following sections, this loss of quality will not be noticeable.
Infill
It should be known that when we talk about parts made in 3D printing, these are usually neither completely hollow nor completely solid, but have a certain percentage of infill that gives them certain properties depending on the needs of each one. This filler does not help to make the transparent PLA as it obviously hinders the passage of light. Therefore, in order to obtain the maximum transparency in your piece, we will try to reduce this infill as much as possible, even eliminating it and making the piece completely hollow if possible.
If this is not possible and for reasons of geometry, mechanical strength, or any other reason we cannot make our part hollow, we will try to reduce the visibility of our infill as much as possible. We can use for example the concentric infill pattern, which does not leave any marks on the surface of the part and reduce the percentage of the infill as much as possible.
Another option is to increase the number of perimeters of the part, in order to avoid the infill pattern we are using leaving marks on the walls of our part.
The union between layers and its glossiness
As we have said before, one of the factors that reduce the transparency of the part is the welds between layers, therefore, the closer the layers are together and the glossier they are, the greater the transparency of our part.
To achieve a shinier finish and greater welding between layers, it is advisable to print more slowly, around 20 mm/s, and at a higher temperature (within the limits recommended by the manufacturer).
Post-processing
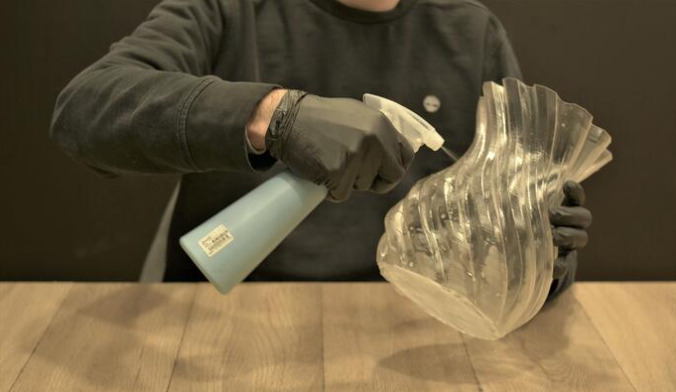
There are many post-processing processes applicable to 3D printing, but when the goal is to achieve a transparent PLA there is one that stands out above the rest. This is the solvent vapor bath, a post-process that will help smooth the layers of the part giving it a crystalline appearance and improving its transparency.
You have two options to perform this process; the first is to use a steam polisher, which helps you control the process time and the amount of solvent applied to the piece. However, if you don’t have a steam polisher, you can always use a sprayer to help you apply the solvent directly to the part. There are just a few things to keep in mind if you are going to use this option:
- You should clean the part with water after applying the solvent on it.
- Try to avoid solvent build-up on the part and apply only a thin layer of solvent.
- If the part is hollow, do not immerse it in water to remove the solvent, try using a spray bottle with water.
- Wait at least 30 minutes to apply another coat of solvent.
In any case, avoid leaving the part in contact with the solvent for more than 10 minutes, and above all, carry out this process in a ventilated and clear environment to avoid problems with toxic gases that may be released by the solvent.
Conclusions
Despite the features offered by transparent PLA, you can increase its transparency with some of the tricks discussed in this article. Remember to use layer heights as large as possible, reduce the infill as much as possible or use the concentric pattern, and subject the part to good post-processing such as a solvent bath. Follow all these tips to get completely transparent pieces and for even more advice on 3D printing materials, visit our knowledge base.